|
|
Arduino AJAX IP Webcam21 March 2015
[This page was recovered from the TheStuffWeBuild WordPress Archive and adapted for this site in 2025.]
 With a fair bit of JavaScript, you can make an Arduino do some amazing tricks. This project in particular pushes all the boundaries of Arduino computing by serving up a dynamic, interactive webpage along with a multitude of features.
You can even have it monitor and control your 3D printer!
With a fair bit of JavaScript, you can make an Arduino do some amazing tricks. This project in particular pushes all the boundaries of Arduino computing by serving up a dynamic, interactive webpage along with a multitude of features.
You can even have it monitor and control your 3D printer!
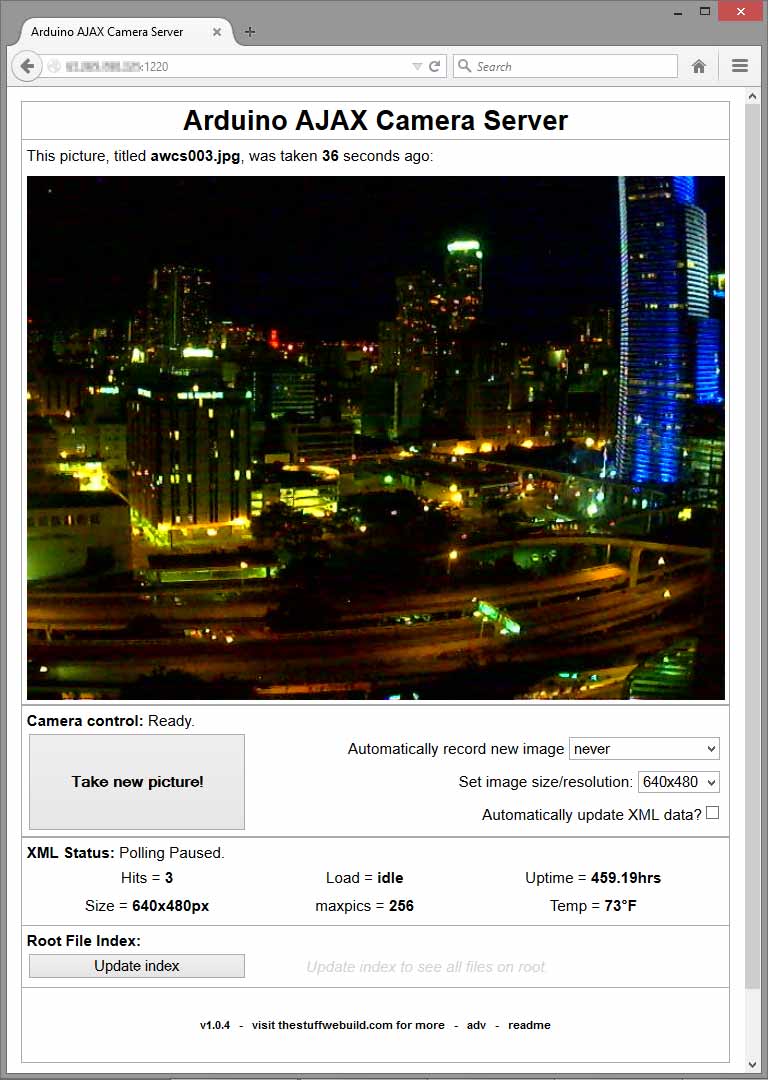
 In this project, we have the Arduino serving up, from a MicroSD card, a carefully crafted HTML file with loads of embedded JavaScript goodness. Once the document is finished loading, the JS takes over and carefully polls the 0.016GHz server looking for freshly crafted XML data.
This data includes everything from the server's local temperature, to its uptime, to the filename and time of the last picture taken, and more. From there, the JS will determine if it should load a new picture, or continue polling data. It is also careful not to pile up a boatload of poll requests that would otherwise bog down the server. A new picture will come through if it detects a filename mismatch between the XML data and the previously loaded image.
In this project, we have the Arduino serving up, from a MicroSD card, a carefully crafted HTML file with loads of embedded JavaScript goodness. Once the document is finished loading, the JS takes over and carefully polls the 0.016GHz server looking for freshly crafted XML data.
This data includes everything from the server's local temperature, to its uptime, to the filename and time of the last picture taken, and more. From there, the JS will determine if it should load a new picture, or continue polling data. It is also careful not to pile up a boatload of poll requests that would otherwise bog down the server. A new picture will come through if it detects a filename mismatch between the XML data and the previously loaded image.
Features
Camera control gives the user a few really cool options. For one, the image size/resolution of the camera can be set as desired. Larger pictures however take exceptionally longer to save and transmit.
A client can also turn off the automatic XML polling. This prevents the image feed from being updated with new pictures if a new client connects and takes pictures elsewhere later on.
Finally, There are two ways to take pictures. A client can either press the "Take new picture" button, or they can start an automatic interval or timelapse feature. This timelapse feature is the same as clicking the button every "x" seconds and waiting for a new image to come through. The JS is also careful not to pile up these image requests as that would bog down the server. A notification text will appear after "Camera control:" stating the exact status of the server.
 Through all this, the JS is again very careful to ensure the health and reliability of the Arduino camera server while also ensuring the client is aware of what's happening. Notifications are always accurately displayed after the title in each of the three main control windows.
XML status lists additional XML data send by the Arduino. This includes local temperature, uptime, server load, a hit counter, most recent image size, and the maximum pictures allowed on the SD card before being overwritten.
Finally, the Root file index portion is built to display a list of the files in the root directory of the MicroSD card. Generating this data could take some time, so the server is limited in the amount of pictures it keeps on its card. This variable is known as "maxpics" and is configurable in the project's code along with many other system variables.
If that's not enough, the entire webpage is chalk full of tool tips that explain everything you need to know. Just hover your mouse over any element you want to know more about.
Through all this, the JS is again very careful to ensure the health and reliability of the Arduino camera server while also ensuring the client is aware of what's happening. Notifications are always accurately displayed after the title in each of the three main control windows.
XML status lists additional XML data send by the Arduino. This includes local temperature, uptime, server load, a hit counter, most recent image size, and the maximum pictures allowed on the SD card before being overwritten.
Finally, the Root file index portion is built to display a list of the files in the root directory of the MicroSD card. Generating this data could take some time, so the server is limited in the amount of pictures it keeps on its card. This variable is known as "maxpics" and is configurable in the project's code along with many other system variables.
If that's not enough, the entire webpage is chalk full of tool tips that explain everything you need to know. Just hover your mouse over any element you want to know more about.
Build one!
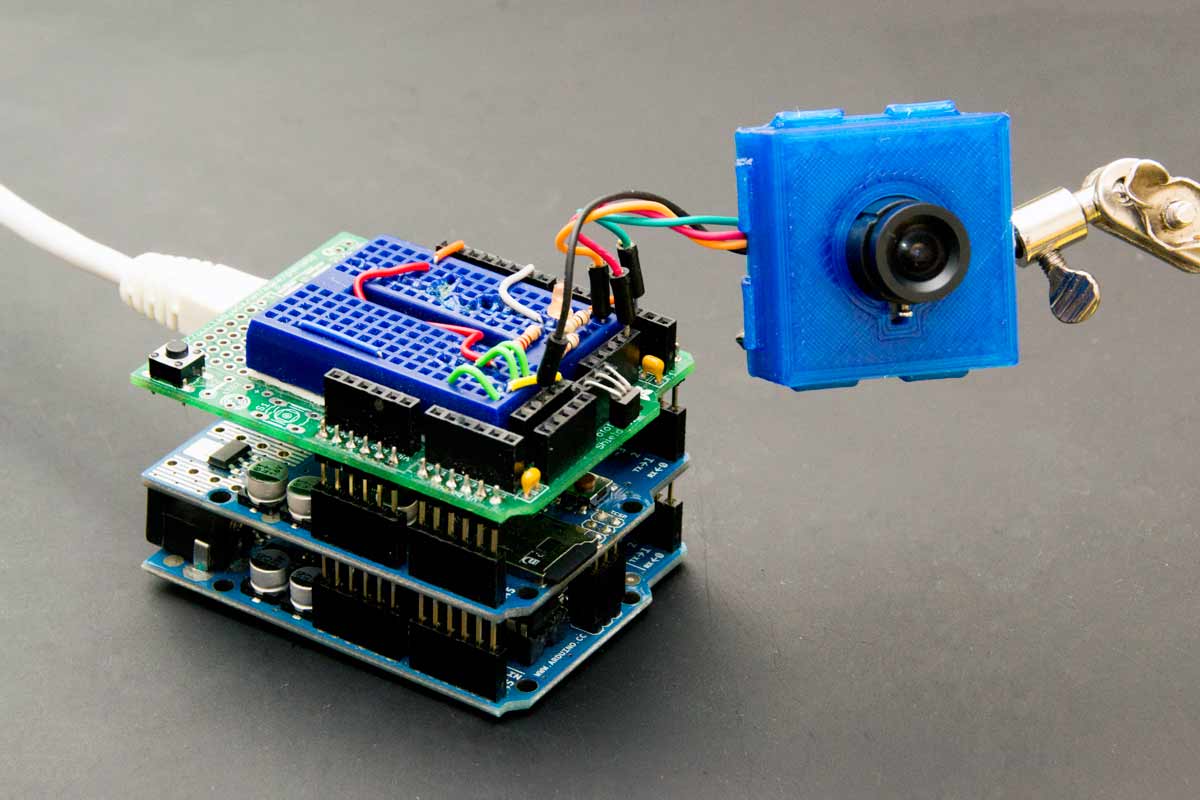
To build this, you will need an Arduino micro controller, an Ethernet Shield, and a serial TTL JPEG Camera. This code was built strictly with the VC0706 TTL JPEG camera in mind.
The Adafruit Serial JPEG Camera (VC0706) should have the its TX wire connected to pin 2 on the Arduino, and its RX wire to pin 3 on the Arduino using a voltage divider (for 3.3v logic; see Adafruit tutorials).
An optional LED can be added to pin 9 that shows data flow in and out of the SD card.
Also, a temperature sensor, like the LM34 or LM35 can be attached directly to A0. The math for it is configurable on the "xml_output" page in the sketch below.
It should be effortless to add more AJAX request options and have the Arduino do even more cool things. The arduino code itself is also carefully commented so you know how everything works inside and out.
Download:
You can download both the Arduino code and the original JavaScript-laden HTML files here:
arduino_ipcam_main_v089b
You can also 3D print your own case for the VC0706 with these files here:
http://www.thingiverse.com/thing:591121
Feel free to share your results with us and the rest of the community.
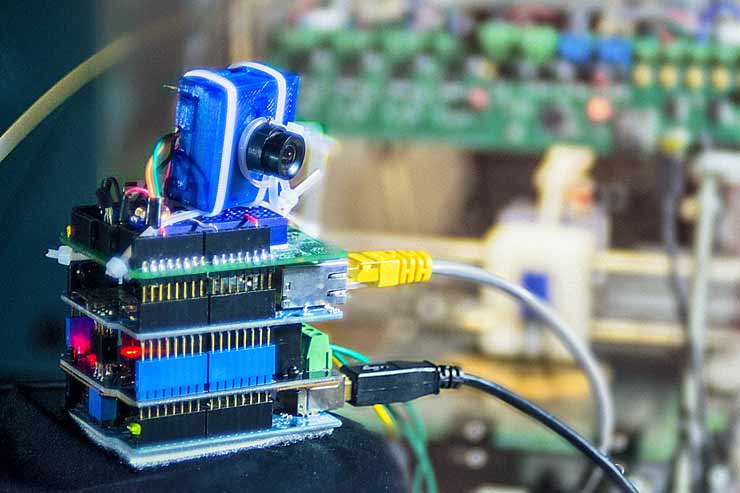
Additional media:
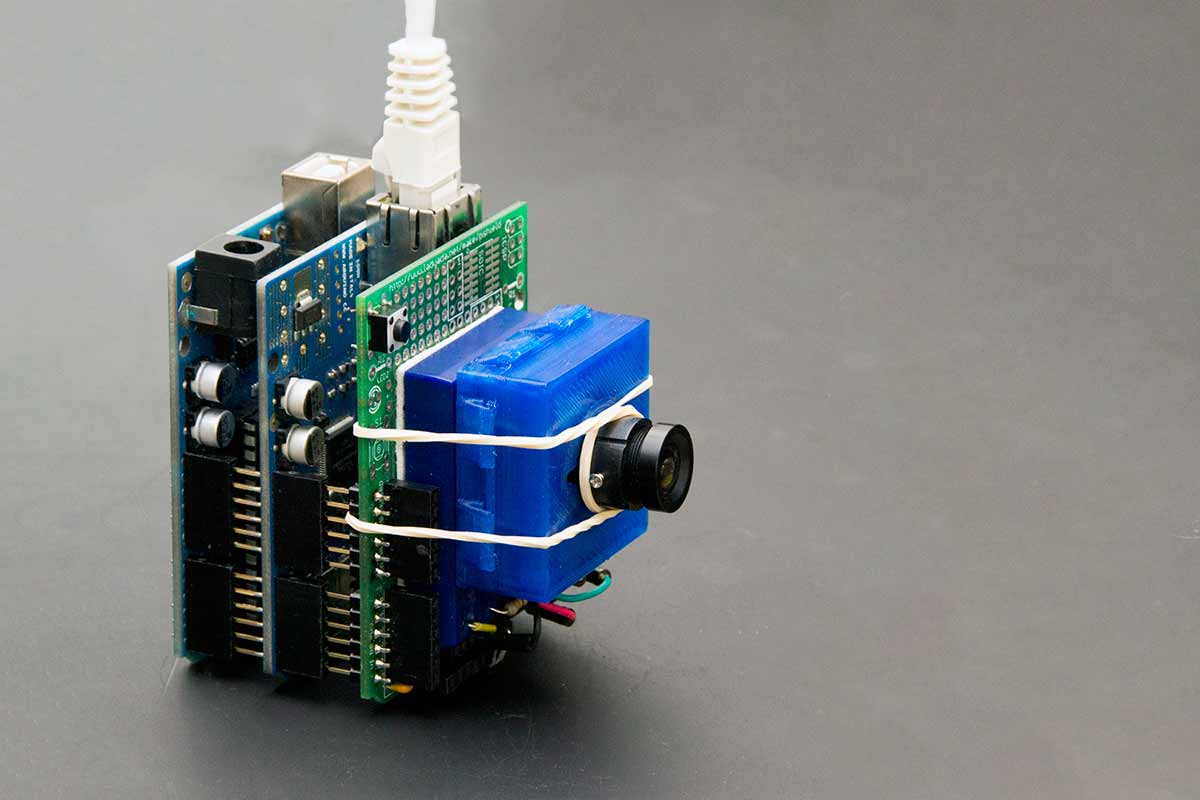
You can quickly build a compact little IP camera module by stacking shields.
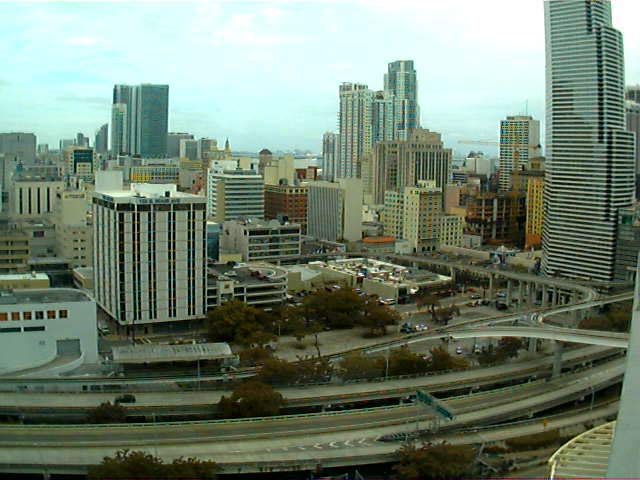
Photo sample.
Using the Arduino AJAX Webcam to Monitor and Control Your 3D Printer
 It's a simple idea. Just modify the source code from our Arduino IP Webcam project page and add an additional set of AJAX response lines that toggle a couple IO pins on the Arduino. You can have these pins go directly to some headers on your 3D printer and/or to an inline power-switch tail that you can toggle in the event of a problem. All the while monitoring your 3D printer visually with a live image feed from anywhere on the World Wide Web.
Heck, while you're at it, you might as well add some remote controlled lighting, and a relay shield. Your only limit is
It's a simple idea. Just modify the source code from our Arduino IP Webcam project page and add an additional set of AJAX response lines that toggle a couple IO pins on the Arduino. You can have these pins go directly to some headers on your 3D printer and/or to an inline power-switch tail that you can toggle in the event of a problem. All the while monitoring your 3D printer visually with a live image feed from anywhere on the World Wide Web.
Heck, while you're at it, you might as well add some remote controlled lighting, and a relay shield. Your only limit is your imagination RAM. Check out this simple user interface:
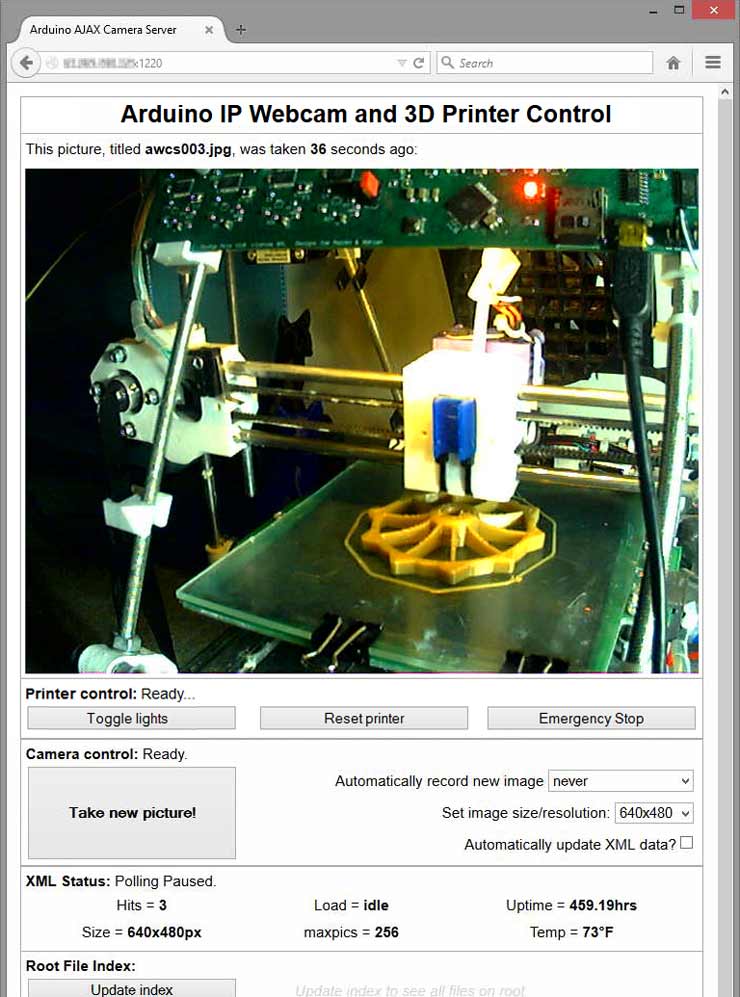 The "Printer control" buttons sends a simple HTTP request in the backround that the Arduino server listens for. Such "commands" can also be executed via appending the appropriate pre-programmed AJAX phrase at the end of the URL like this: http://yourarduinosip:port/?pwr
To add some level of protection, you can also add a basic HTML+JavaScript password prompt that blocks unwanted control over your printer.
The "Printer control" buttons sends a simple HTTP request in the backround that the Arduino server listens for. Such "commands" can also be executed via appending the appropriate pre-programmed AJAX phrase at the end of the URL like this: http://yourarduinosip:port/?pwr
To add some level of protection, you can also add a basic HTML+JavaScript password prompt that blocks unwanted control over your printer.
 Once the Arduino receives the request, it will complete the desired action and return some form of a response to indicate that all was successful.
Here is an example of what the Arduino server may listen for. In this case it is looking for the string "?pwr" after the main URL (http://yourarduinosip:port/?pwr).
Once the Arduino receives the request, it will complete the desired action and return some form of a response to indicate that all was successful.
Here is an example of what the Arduino server may listen for. In this case it is looking for the string "?pwr" after the main URL (http://yourarduinosip:port/?pwr).
//AJAX request line for toggling printer's power relay
if (strstr(clientline, "GET /?pwr") != 0) {
  code200(client);               //give client a responce header
  if (is1 == 0) {                //if relay is off, turn it on
    digitalWrite(relay1, HIGH);
    is1 = 1;
  }
  else {                         //if relay is on, turn it off
    digitalWrite(relay1, LOW);
    is1 = 0;
  }
  client.print(F("done."));      //tell client we are done
  break;
}
All you'll need to do is copy the code above over to the appropriate place in the example sketch, declare/edit your variables, then edit or add a new button in the example HTML file.
If you are new to HTML or Javascript, head on over to w3schools.com/js and tinker with some of their examples. It's easier then you might think.
Give it a try and share your results!
A shutout goes to the entire Arduino community for providing thousands of example sketches and projects like this one for the world to see and build upon. Thank you.
|